| ||||
Online version (v1.0)
Make your selection from the Menu below to display different information.
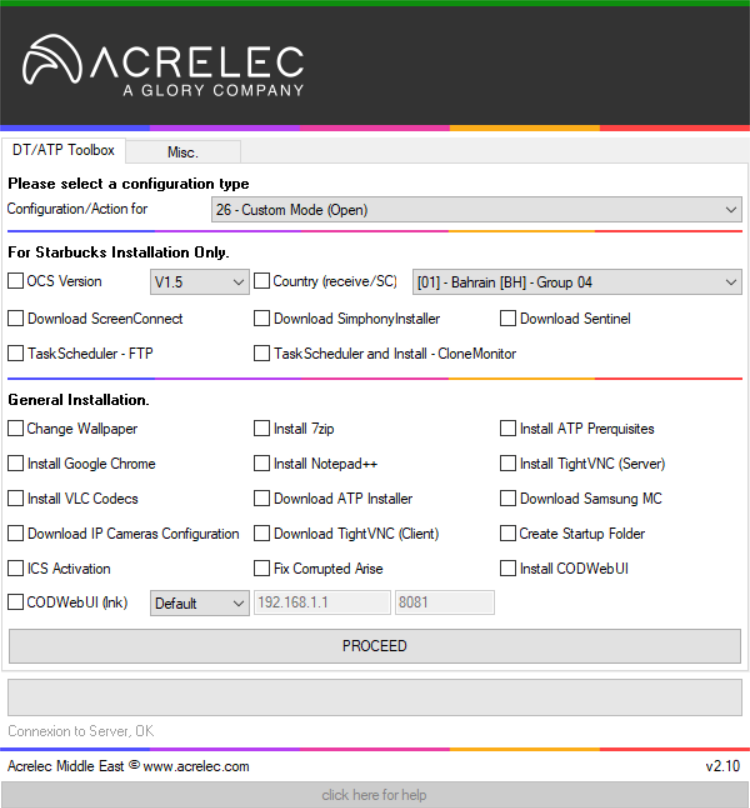
This All-in-One Tool can be used for any ATP Devices.
It is Populated with general actions to be performed, it is also possible to select the Open Mode and make your own selection from the Checkbox.
A section is dedicated for the Setup and Configuration of Starbucks devices (OCS PC and PPC) this section should NOT BE USED for regular ATP Devices.
The Tab DT/ATP Toolbox, will be active ONLY if there is Internet. In this case, the Connection Status Bar will be Dark GREEN and the Tool can be fully used.
If there is no Internet, the Connection Status Bar will be Dark RED and a Pop-up will be displayed.
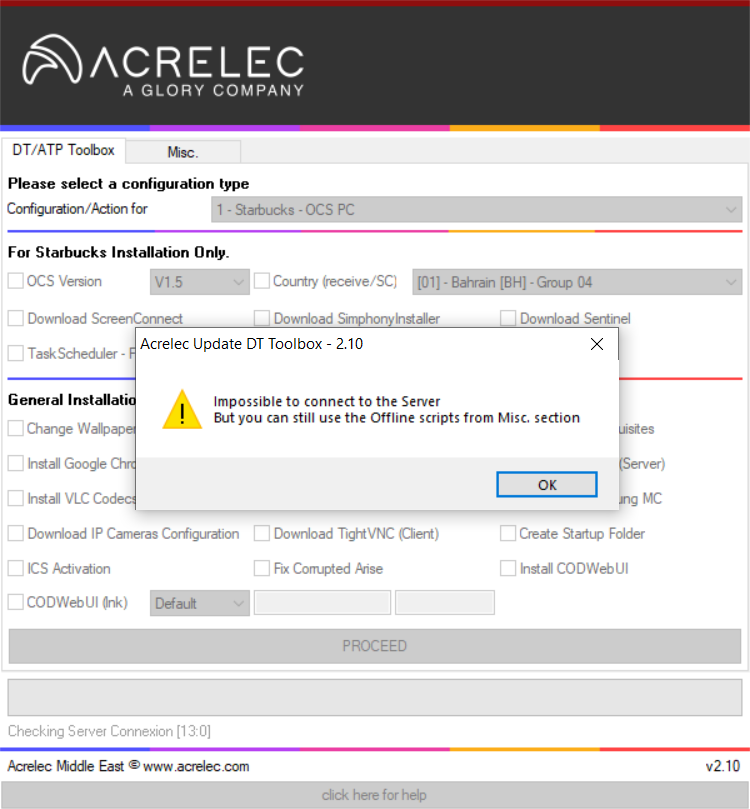
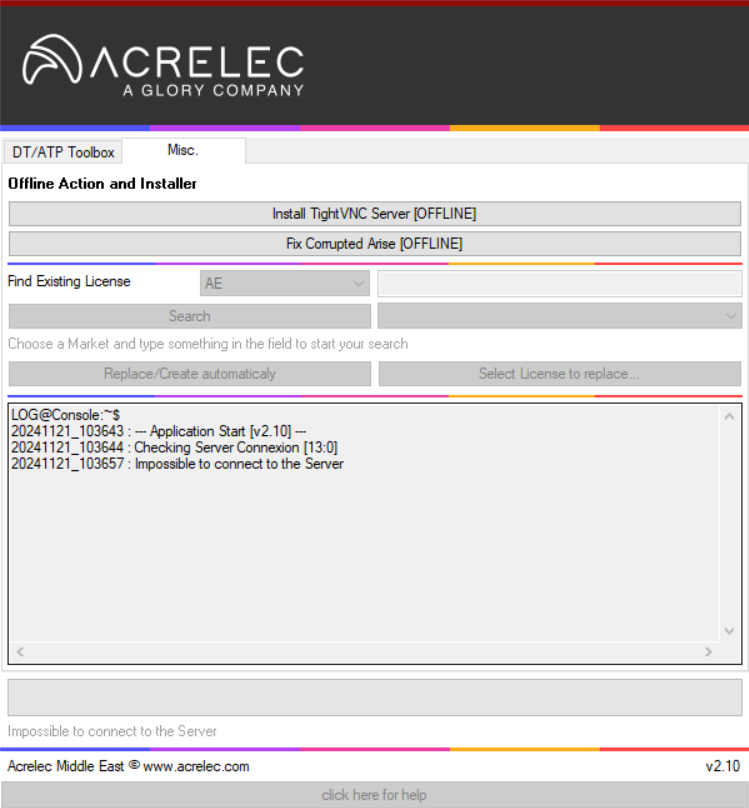
In this case, you can still use the 2 [Offline] actions from the Misc. Tab
Below is a list of the Actions done by the application.
| [#] | NAME | FOR | ACTION | CODE |
|---|---|---|---|---|
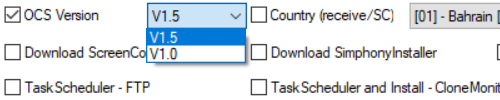
| 1 | OCS Version | Starbucks | This will download and extract BBOX and create bbx.ini based on selection (V1.0 or V1.5)
| 6 |
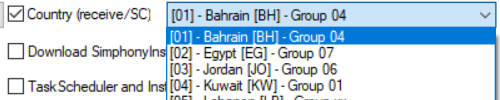
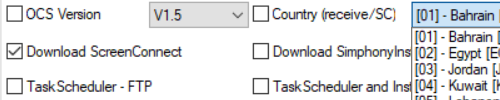
| 2 | Country (receive.bat/SreenConnect) | Starbucks | This will Create the receive.bat file and move it to C:\COD_V1.5. The code for the Group will be the one from the selection in the List.
| 1 |
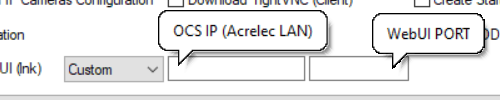
| 3 | WebUI lnk (use WebUI fields below) | All | This will create the Shortcut to Start the WebUI Page (usually for the Camera PPC). It is now possible to customize the IP and PORT to open as CODWebUI.
| 2 |
| 4 | Download ScreenConnect | Starbucks | Download ScreenConnect according to the selection done in the List and move it into C:\INSTALL folder.
| 2 |
| 5 | Download SimphonyInstaller | Starbucks | Download SimphonyInstaller and move it into C:\INSTALL folder.
| 2 |
| 6 | Download Sentinel | Starbucks | Download Sentinel and move it into C:\INSTALL folder.
| 2 |
| 7 | TaskScheduler - FTP | Starbucks | Create the Task for the start the FTP Script at 3:00am.
| 1 |
| 8 | TaskScheduler and Install - CloneMonitor | Starbucks | Download and Install the CloneMonitor App used for COD V1.0. Create the Task for the Setup of the CloneMonitor App.
| 4 |
| 9 | Change Wallpaper | All | Copy and Apply (Center) the Wallpaper.
| 2 |
| 10 | Install 7zip | All | Download and Install 7zip.
| 2 |
| 11 | Install ATP Prerquisites | All | Download and Install the different Packages to help in speed up the installation of ATP Core.
| 12 |
| 12 | Install Google Chrome | All | Download and Install Google Chrome.
| 2 |
| 13 | Install Notepad++ | All | Download and Install Notepad++.
| 2 |
| 14 | Install TightVNC (Server) | All | Download and Install TightVNC (Server).
| 1 |
| 15 | Install VLC Codecs | All | Download and Install VLC Codecs used for COD V1.0
| 2 |
| 16 | Download ATP Installer | All | Download ATP Installer and move it on the Desktop folder.
| 2 |
| 17 | Download Samsung Monitor Configuration | All | Download Samsung Monitor Configuration and move it into C:\INSTALL folder.
| 2 |
| 18 | Download IP Cameras Configuration | All | Download IP Cameras Configuration and move it into C:\INSTALL folder.
| 2 |
| 19 | Download TightVNC (Client) | All | Download TightVNC (Client) and move it into C:\INSTALL folder.
| 2 |
| 20 | Create Startup Folder | All | Create an easy access to the Startup folder, on the Desktop.
| 1 |
| 21 | ICS Activation | All | Enable Internet Connection Sharing (usually for the OCS PC)
| 5 |
| 22 | Fix Corrupted Arise | Starbucks | This will fix a corrupted stand-alone Arise application (bad XML files)
| 1 |
| 23 | Install CODWebUI | Starbucks | This will download and extract CODWebUI
| 2 |
The Connection Status Bar will indicate if the Tool was able to reach out the Server.
| COLOR | REMARK |
|---|---|
| A Dark Green color indicate that the Tool is able to reach the Server and in this case, the Tool can be fully utilized |
| A Dark RED color indicate that the Tool is NOT able to reach the Server and in this case, only the [Offline] Action from the Misc. Tab can be used. |
Below each Checkbox is located a Status Indicator, this Indicator will change in color according to the result of the Action performed.
| COLOR | REMARK |
|---|---|
| A GREEN Color indicate that the Action was performed successfully. |
| An ORANGE Color indicate a Warning and that some parts of the Action may NOT been have performed successfully. You can check the LOGS or the Console Zone for more details. |
| A RED Color indicate a Fail of the Action. You can check the LOGS or the Console Zone for more details. |
| A BLUE Color indicate that the Action was NOT performed but it's not an error, this mainly applies when an Application is already installed and was, then Skipped. For the ATP Prerequisites, if somes of the Prerequisites are already installed, the color will be ORANGE and if ALL Prerequisites are already installed, then the color will be BLUE. |
Acrelec Middle East Production © 2026